Quantcast
Channel: Saurav Dhyani - #MSDynNAV & #MSDyn365bc
Viewing all 1145 articles
Browse latest View live

Error After Restore SQL Backup of NAV 2013 Database

$
0
0
Hi all,

we are facing a conman issue during restoring a SQL Database backup restored for NAV 2013.

While Trying to run object from Object Designer we get below listed error (even the service is configured properly) -
---------------------------
Microsoft Dynamics NAV Development Environment
---------------------------
There are no NAV Server instances available for this database. You must ensure that a NAV Server instance is running and is configured to use the database before you perform this activity.
---------------------------
OK   
---------------------------


While Trying to Run The Role Tailored Client we get below listed error -

---------------------------
Microsoft Dynamics NAV
---------------------------
A fatal error occurred. The connection to SQL server cannot be established or is no longer usable. This can be caused by one of the following reasons:
* The server has been shut down manually or because of an error.
* The SQL server connection settings are not correct
* A network failure has occurred.
* A hardware failure has occurred on the server or on your computer.
Try again later or contact your system administrator.
---------------------------
OK   
---------------------------

Resolution -

To resolve these error open SQL Server Management Studio.
Go to Security and open Login Folder.
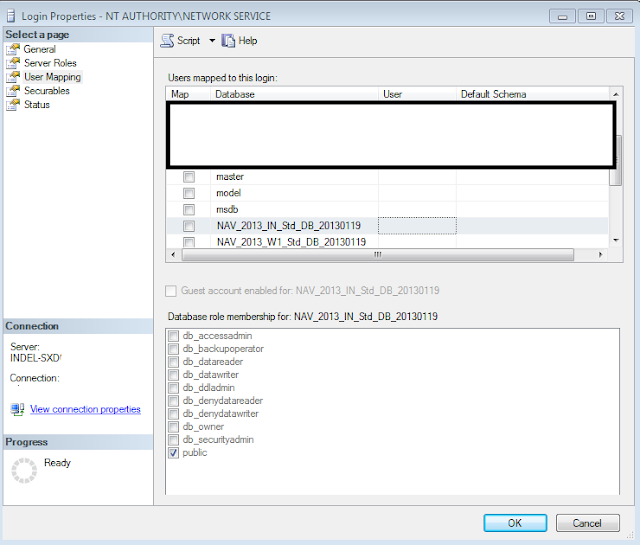
Go to Properties of User - NT Authority\Network Service as shown below.

From the left panel select User Mapping.
Place a check mark on the database that you want to access in my case there are two databases as shown below.


I will put a check mark on the Map for these two databases.
In default schema i will select $ndo$navlistener as shown below.


Click OK and restart the service.

The issue is resolved.

Thanks & Regards,
Saurav Dhyani
http://saurav-nav.blogspot.in/

Grid Layout in NAV 2013.

$
0
0

Hi All,

A new Page Designer concept has been introduced in NAV 2013, i.e. Grid Layout.

This concept provides us a little facility for placing of control in the page.  Let’s try to work on same.
Below is the how Standard Customer Page look like.

I would like to save some space which is being used by multiple Data Fields. Like Post Code, Country/ Region Code & State Code.

I want all these three fields in one Row, so that some space can be saved.

Below is the standard Page Designer –


Here are the steps -
        1)      Before Post Code I will add a grid Layout Group.  
        2)      After Grid Layout Add a Group. [Indented it to above Row]
        3)      Indent fields Post Code, Country/ Region Code and State Code to Above Row.

The Layout Should Look Like –


Now Go to Grid Layout Properties and set Layout to Rows.


Let’s see the preview of page now.

Now if I want to give name to this whole group as something Just Set the caption Property of Group.  Suppose I set it to Other Address Details.

In NAV 2013, we can also hide the caption of the fields that are being displayed. To set that property I went to properties of Post Code, Country/Region Code and State Code.

I set the property of ShowCaptionas No.


Let’s Save the page and see how the final page looks like.


If you still have some issues, download the Fob for the same From - DropBox.

The Object is with ID 50001.

Regards,
Saurav Dhyani


Export to Excel - Delete Un-used Sheets

$
0
0
Hi all,

I know most of us know if but i still got queries where some of our colleges don't know how to delete the un-used sheets while add export to excel functionality in a Report.

So if you know how to do it you can skip this article.

Issue -
When we add the functionality of Export to excel we get a output as shown below. The excel Workbook contain sheets Report and Other standard Sheets which are named as Sheet1 , Sheet2 & Sheet3.


The sheets 1,2 & 3 are of no use and are empty. I don't want these sheets.

Resolution -
I prefer it by creating a function in master tables and calling it from report. I would suggest this also because if you create it in report then you need to create it every time.

I created a function in Table Excel Buffer and i named it as DeleteUnusedSheet as shown below -

PROCEDURE DeleteUnusedSheet@1102153003(SheetName@1102153000 : Text[30]);
    BEGIN
     XlWrkSht := XlWrkBk.Worksheets.Item(SheetName);
      XlWrkSht.Delete;
    END;  


I call this function in Post Report before Giving User Control to the sheet (Function - GiveUserControl).

How to Use From Report -

As  shown above i just called the function before Function GiveUserControl.

I hope you will like this post.

Regards,
Saurav Dhyani
http://saurav-nav.blogspot.com/

NAV 2013 Certification YET to Come...

$
0
0
Hi all,

While Browsing the Partner source i figured out that we need to wait for NAV 2013 till October 2013.

Microsoft have put up the  Microsoft Dynamics NAV Certification Exam Preparation Guides for NAV 2013 and there are some changes in Professional Exams also.

Have a look on the Link here for the details and material for NAV 2013 Certifications.

For Professional exams you will find links at the bottom of the same page.

* You require a valid Partner source login to access above link.

As of Now the materials is only released for -
1. C/SIDE Solution Development
2. Core Setup and Finance
3. Installation & Configuration

So let's download the material and start studying to get ready for exams in October 2013.

Best of Luck. :)

Regards,
Saurav Dhyani
http://saurav-nav.blogspot.com/

Report Export to Excel with Font & Colour

$
0
0
Hi all,

As required by most of the Blog visitor here is a post for export to excel with Font Size, Font Color, Background Color and Font Name.

Let's see how we can achieve them -

1. I have added some fields in Excel Buffer Table (370) listed Below.


Field No.Field Name        Data TypeLength
50000Font Size                 Integer
50001BackGround ColorInteger
50002Font Name              Text                100
50003Font Color               Integer


2. Now i need to create a new function which will input values for these fields. I copied the standard function AddColumn and Created a New Function AddColumnNew with additional parameters as shown below.

Function AddColumnNew-

IF CurrentRow < 1 THEN
  NewRow;

CurrentCol := CurrentCol + 1;
INIT;
VALIDATE("Row No.",CurrentRow);
VALIDATE("Column No.",CurrentCol);
IF IsFormula THEN
  SetFormula(FORMAT(Value))
ELSE
  "Cell Value as Text" := FORMAT(Value);
Comment := CommentText;
Bold := IsBold;
Italic := IsItalics;
Underline := IsUnderline;
NumberFormat := NumFormat;
"Font Size" := FontSize;                                             //NEW LINES IN BOLD
"BackGround Color" := BGColour;                        
"Font Name" := FontName;                                     
"Font Color" := FontColor;                                       
INSERT;


Below is the list of local parameters in the function -


NameDataTypeSubtypeLength
ValueVariant
IsFormula        Boolean
CommentTextText                1000
IsBoldBoolean
IsItalics        Boolean
IsUnderlineBoolean
NumFormatText               30
FontSize        Integer                                    // NEW Parameter IN BOLD
BGColourInteger                                    
FontNameText               100              
FontColorInteger                                  

Testing -
For testing i am using Standard Report 108 - Customer - Order Detail. i have changed the code in function MakeExcelDataBody().

The First four lines of the function are changed as shown below -


//ExcelBuf.AddColumn(Customer."No.",FALSE,'',FALSE,FALSE,FALSE,'');
ExcelBuf.AddColumnNew(Customer."No.",FALSE,'',FALSE,FALSE,FALSE,'',20,0,'',0);
                                                 //Font Size Set to 20

//ExcelBuf.AddColumn(Customer.Name,FALSE,'',FALSE,FALSE,FALSE,'');
ExcelBuf.AddColumnNew(Customer.Name,FALSE,'',FALSE,FALSE,FALSE,'',0,10,'',0);
                                                  //Background Colour Set to Green

//ExcelBuf.AddColumn(SalesHeader."No.",FALSE,'',FALSE,FALSE,FALSE,'');
ExcelBuf.AddColumnNew(SalesHeader."No.",FALSE,'',FALSE,FALSE,FALSE,'',0,0,'Cambria',0);
                                                   //Font Changed to Cambria

//ExcelBuf.AddColumn(SalesHeader."Order Date",FALSE,'',FALSE,FALSE,FALSE,'');
ExcelBuf.AddColumnNew(SalesHeader."OrderDate",FALSE,'',FALSE,FALSE,FALSE,'',0,0,'',-16776961);                                            
                                                   //Font Color Set to Red


Output -
When i run the Report and select Export to Excel, below is the output that i got.


Column 1- Font is 20.
Column 2 - Background Color is green.
Column 3 - Font is Cambria.
Column 4 - Font color is Red.

You can download the FOB for NAV 2009 SP1 Table 370 Excel Buffer from DropBox

The Fob Contain the functions discussed in this post as well as the cell merging function.

Regards,
Saurav Dhyani


What is the ODATA?

$
0
0

Hi all,

Its been so long from my last post.
Sorry for that, i am busy these days and don't get time to put my experiences in the BLOG.

As we all know a new Service is available in NAV 2013 aka ODATA.

Let's try to figure out what is OData?

OData is Open Data Protocol.


The Open Data Protocol (OData) is a Web protocol for querying and updating data that provides a way to unlock your data and free it from silos that exist in applications today.OData does this by applying and building upon Web technologies such as HTTP, Atom Publishing Protocol (AtomPub) and JSON to provide access to information from a variety of applications, services, and stores.


In reference to Navision there are something that we need to keep in Mind while using OData -


1. It is not currently possible to access codeunits with OData web services.

2. OData web services are currently read-only. 
You cannot update data in a Microsoft Dynamics NAV database using an OData web service.

The OData standard is well suited for web service applications that require a uniform, flexible, general purpose interface for exposing create retrieve update delete (CRUD) operations on a tabular data model to clients. 

OData is less suited for applications that are primarily RPC-oriented or in which data operations are constrained to certain prescribed patterns. 

OData supports Representational State Transfer (REST)-based data services, which enable resources, identified using Uniform Resource Identifiers (URIs), and defined in an abstract data model (EDM), to be published and edited by web clients within corporate networks and across the Internet using simple Hypertext Transfer Protocol (HTTP) messages. 

OData services are lightweight, with functionality often referenced directly in the URI.


OData is supported in PowerPivot, a data-analysis add-in to Microsoft Excel 2010 that provides enhanced Business Intelligence capabilities.

We will discuss OData in future posts.

Regards,
Saurav Dhyani
http://saurav-nav.blogspot.in/

Introduction of ODATA Services In NAV 2013.

$
0
0
Hi all,

Let's discuss about a New Services came up with NAV 2013 - ODATA. In the post we will see the basic introduction about ODATA, how to enable it and how it can be browsed.

Later on we will discuss on how to consume data exposed via ODATA.

If you see the service console of NAV 2013 aka Microsoft Dynamics NAV Administration you will see a separate tab for ODATA Services as shown below -


As you can see the parameters in this tab are pretty self explanatory.

First thing need to be done is Enable OData services from the console if it is not enable by default.

Let's try to browse the the port in Internet Explorer.

The URL to test the ODATA Services is - http://localhost:7048/DynamicsNAV70/OData/

Where -
Localhost - is the Server name where it is hosted (in my case it is hosted on local machine).
:7084 - is the port where it is hosted on server.
DynamicsNAV70 - Service Instance Name.
OData - is open data protocol.

Here is what i got response of above query from Internet Explorer.

So as of now nothing has been exposed. Exposing is same as of NAV 2009 version with an addition, we can expose Pages, Codeunits and Queries.

Open the NAV 2013 windows Client and navigate to
Departments/Administration/IT Administration/General/Web Services


Edit the page and expose the object you want. I am using Customer Card, Page 21.
I name it NAVCustomers as shown.


Lets refresh the URL in Internet Explorer. Yeah, i can see NAVCustomers there in the list.

Let's try to find the data that is exposed. But How?

Here is the URL for same - http://localhost:7048/DynamicsNAV70/OData/NAVCustomers


In right hand side you can see the No of records the have been feeded.

we will see the consumption of feed in Next Post.

Regards,
Saurav Dhyani
http://saurav-nav.blogspot.com/ 

Consuming Output of ODATA - Part 1

$
0
0

Hi all,

As discussed in earlier post today we will try to consume output from the ODATA Services.

The best tool that i like for same is Power Pivot, an Microsoft Excel add in.

You can download same from link - Power Pivot

After installing the add-in lets try to consume the output from ODATA Service hosted yesterday for Customer Card.

Here is the URL - http://localhost:7048/DynamicsNAV70/OData/NAVCustomers

Steps -
1. Open Excel.
2. You will find a new tab in Ribbon called Power Pivot as shown below.

3. Click on PowerPivot Window, icon placed at left corner of the screen.
4. A new window will open as shown.


5. The Power Pivot Addin can accept data from Multiple sources like Text, Access, Database and many others. For ODATA we will be using the From Data Feeds.

6. Click on From Data Feeds.
7. Type in the Friendly Name and Copy the URL from above to Data Feed URL.
8. Click Test Connection.


9. Click Next and then finish.
10. After some time you will find that data Feed have been imported and status will tell you the no of rows transferred.


11. Now all the data from customer table is there in excel, most of customer find it easy to do analysis here.
12. From time after time you can refresh the data to find update in navision.

13. From this you can create Pivot Tables & charts which can be accessed via ribbon of power pivot.
16. With Excel 2010, the Pivot charts are also too good with Slicer as you can see in the Left and Right Part of the Pivot Chart below.


The slicer can be added, by selecting the pivot chart and then from ribbon select analyze Tab.
Here you will find menu to insert slicer.

You can save the sheet and see the changes by updating the Power pivot whenever required.

I hope you will like the post. We will see other consumption uses of ODATA Feed in future posts.

Regards,
Saurav Dhyani

Max. Page Size in ODATA Parameter.

$
0
0

Hi all,

Today we will discuss the impact of parameter Max. Page size in ODATA Tab of the service tier.


It is called as "Server-Driven Paging in OData Web Services".

Server-driven paging ensures that the quantity of data that is returned by an OData URI does not overwhelm Microsoft Dynamics NAV Server or client program that you use to capture data, while optimizing performance.

The term page refers only to a page that contains OData results and is not related to Microsoft Dynamics NAV page objects.

The Max Page Size setting specifies the maximum number of entities returned per page of OData results. The default value is 1000.

You can consider a page to be a chunk of data. A large data feed is divided into chunks of data. Each chunk contains no more entities than the value of Max Page Size.

An increase in the value of Max Page Size creates fewer chunks (or pages) per request, which in turn, decreases the processing time.

However, an increase in the Max Page Size will increase the memory consumption on the Microsoft Dynamics NAV Server or client. If the value is too large, it can overload the memory on Microsoft Dynamics NAV Server.

For performance reasons, you should try to set the value of the Max Page Size as large as possible without overloading Microsoft Dynamics NAV Server.

If the computer that is running Microsoft Dynamics NAV Server is returning out of memory exceptions, then you should reduce the value of Max Page Size until the errors stop.

When using OData with queries that are set with a top number of rows by either the TopNumberOfRows Property and TOPNUMBEROFROWS Function, you should set the Max Page Size value greater than the value of the TopNumberOfRows property and TOPNUMBEROFROWS function.

In the CustomSettings.config file for Microsoft Dynamics NAV Server, the Max Page Size setting is called ODataServicesPageMaxSize.

Regards,
Saurav Dhyani
http://saurav-nav.blogspot.in/

Configuring a Profile in Role Tailored client

$
0
0

Hi all,

I know most of this know this, but this is some of us who are still doesn't know about configuring the Role center page.

Let's start with the article provided by Microsoft for Configuring a Profile. The article can be read here.

Let's follow the steps and try configuring profile "ORDER PROCESSOR".

Step 1 - At the command prompt, navigate to the root folder of the Microsoft Dynamics NAV Windows client.
         cd C:\Program Files (x86)\Microsoft Dynamics NAV\70\RoleTailored Client


Step 2 - Type the following command: Microsoft.Dynamics.Nav.Client.exe -configure -profile: "profileid"
In My case it is - Microsoft.Dynamics.Nav.Client.exe -configure -profile:"ORDER PROCESSOR"

But i got an error message popup saying - You do not have the permission to configure the 'ORDER PROCESSOR' Profile.


What can be the casue of the issue?

Its just the Owner property in the profiles.

Open the RTC (Windows) Client and navigate to
CRONUS India Ltd./Departments/Administration/Application Setup/RoleTailored Client/Profiles.

Select the profile you want to configure and select your ID in Owner ID Field. That's it.


Once done run the same command in step 2 in command prompt. Walla RTC client opened.

Now do the changes for the user level as per your wish, like i want to hide department for the profile.

So i went to customize navigation pane. Select & Removed the department button.


Now close the RTC client and open it from the start menu.

If you have the profile of order processor in user personalizaion you will not see and will not able to enable the department tab.


If you want the department tab back, go to configuration mode and restore it to default.

I hope some of us will find this post useful.

Thanks & Regards,
Saurav Dhyani
http://saurav-nav.blogspot.in/

NAV 2013 Rapid Start Error - "There is no application associated with the specified file for this operation."

$
0
0
Hi all,

I got an error message due to a mistake done by my during Export Raid Start Package. Spent lot of time to resolve below listed error.


Just thought to share the resolution for same, may be it's save someone time.

Reason for the Error -
Let's see why the above listed error occurred.

While exporting a package there is a window that comes up, as shown below.


If by mistake you clicked on "Always ask before performing this action type of file.", and clicked open you will end up with the error message solution above.

Resolution -

This error is not machine dependent, which is the common reason for the error "There is no application associated with the specified file for this operation." in windows.

This is a error related to user, yeah so it need to be saved somewhere in navision or related files. I tried all the table data which store personalizaion data but end up with deleting the file.

You can find this file in "C:\Users\<user name>\AppData\Roaming\Microsoft\Microsoft Dynamics NAV"


Just delete the file and try logging again in Navision. It will resolve the error.

Regards,
Saurav Dhyani
http://saurav-nav.blogspot.in/

Integrating with Microsoft OneNote - Part 1

$
0
0

Hi all,

I was just going through article about Integrating with Microsoft One Note in MSDN.

With Microsoft OneNote 2010 integration you can attach notes to customers, items, or invoices. One Note notes can be created for a specific record, but also for a whole page depending on the setup.

Reminder - Pages notes can only be used on pages that are based on a source table. This means that, for example, the Role Center page cannot use page notes.

Where we can see it in Default NAV Page.

Open any Page Like Customer Card and in the Ribbon you will see the One Note Icon Disable.


Let's Try to Set This Up in NAV 2013.

1. Open the Role Center Client of NAV 2013 and Navigate / Search Profiles Page.

Navigation - Departments - Administration - Application Setup - RoleTailored Client - Profiles

2. Open the Profile for which you want to set One Note, as shown below i am using ORDER PROCESSOR.


In the right and side you will find One Note as highlighted above.

3. As we can see One Note can be integrated in two ways, one for Record and Another for Page. But we have only one Icon in our Pages.

4. Let's first enable the Both One Note for Record and Pages.

5. Open the Sales Orders and customize the Ribbon. Under Microsoft Dynamics NAV, Help you will find Page Note. Just add it in the same tab where Record Note(One Note) exist.


6. Repeat the Steps in Sales Order Card, Posted Sales Invoices, Posted Sales Shipments,Posted Sales Invoice, Posted Sales Shipment.

i.e Add Page Note in Sales Order List & card, Posted Sales Invoice List & Card, Posted Sales Shipment List & Card.

7. Now in all these page you will find multiple OneNote Icon as shown Below.


In Next Post we will Create a One Note Book and will see integration of it in Navision.

Regards,
Saurav Dhyani
http://saurav-nav.blogspot.com/

Integrating with Microsoft OneNote - Part 2

$
0
0

Hi all,

As discussed in earlier post, let's Try use One Note Integration in Local Machine.

If you haven't read the earlier post click here.

1. Open Navision and Open Profiles by Search box or navigating to
   Departments - Administration - Application Setup - RoleTailored Client - Profiles

2. Open Profile for which you want to set One Note Integration.

3. Click on Use Record Notes OR/AND Use Page Notes as per your Requirement.

4. Put the path of Notebook in my case D:\OneNote, in Record NoteBook or Page NoteBook.
   The Path is where the One Note For Record Notes And Page Notes to be saved.


Restart Navision.

5. Let's Open sales Orders Page (Sales Order List).
6. Click on Page Note and a screen shown below will appear.


7. Type in the information about the Page and close the OneNote as shown below. The information that you typed will remain save in this page.


8. Now lets create a new sales order. After Creating click on the BIG Icon of OneNote (its Record Note).

9. Type in the information that you want to keep for this record / document as shown below.


10. Now Let's Post it and navigate to Posted Shipment and Invoice.

11. Open the shipment & Invoice. Then Click on OneNote Icon to see Record Note. Oh Wow it automatically shows all information stored for the order.


12. But if you click on the Link that was created on ONE NOTE, it gives you an error.


13. Lets see why. Open the Developer Environment and Run the Table 2000000068 Record Link.


14. The URL in the table shows that it still points to Sales Header 1002, i.e the Record Link Table does not get Updated during Posting.

15. This is the reason that when we click on the hyperlink after posting it gives an error message.

16. Let see the content in D:\OneNote. The Folder have Three NoteBook - Open NoteBook, Page Notes & Sales Header.


17. So the Record notes are grouped based on Document Type but Page Notes are stored in One Book, as shown below.


I hope this post will help you to test and use the One Note Integration feature introduced in NAV 2013.

Regards,
Saurav Dhyani
http://saurav-nav.blogspot.in/

Running Multiple Web Service In NAV 2009, 2009 SP1 & 2009 R2.

$
0
0
Hi all,

In all the previous posts we have discussed about how to create multiple NAV Services to Run Multiple RTC for same or Different version of Role Tailored Client.

But we never discussed about how we can create multiple Web Services.

I required to Publish Multiple Web services and that is the reason i come up with this Post. Hope you will find it use of this post somewhere.

You might be thinking what new will be there as we create Navision services we can also create web services too.

Yeah you are right but there are some fix parameters will differentiate between a web service and a NAV Service. Lets see.

Here is a image of my services before i start -


As you can see currently there are two services, 1 web service and one NAV Service.

As you have gone through multiple post about creating multiple services some of the steps below are same -

1) Copy the service Folder - Default Path -C:\Program Files (x86)\Microsoft Dynamics NAV\60

2) Rename the copied to Folder say Service 2.


3) Open the config file of from the new folder created and change the below listed things -

   a) Port No. - (if Port sharing is not enabled).
   b) Server Name.
   c) Database Name.
   e) Server Instance.


4) Open Command Prompt, RUN as administrator.

5) Copy the command give below after changing the name and folder name as per your requirement.

SC CREATE "MicrosoftDynamicsNAVWS$WS2" binpath= "C:\Program Files (x86)\Microsoft Dynamics NAV\60\Service2\Microsoft.Dynamics.Nav.Server.exe $WS2" DisplayName= "Microsoft Dynamics NAV Business Web Services2" start= auto obj= "NT Authority\NetworkService" type= Share depend= NetTcpPortSharing

Where Bold Parameters are mandatory. 

These parameters identifies that the service to be created is a web service -
MicrosoftDynamicsNAVWS 
$WS2
type= Share

Copy the command in Command Prompt and hit enter.

Service will be created successfully.


If you skip the parameters specified above you might end up with the error message shown below.


So make sure that you keep in mind about the bold parameters and create service again. It will work fine.

Thanks & Regards,
Saurav Dhyani

Get Ready for New Version of NAV - NAV 8 / Sicily

$
0
0
Hi all,

As per my understanding yeah the rumors about new version are true.

CodeName - Sicily (for Navision 8).

Microsoft Dynamics NAV Sicily offers “continued innovation” and a focus on improving functionality in the standard product.

Sicily builds on the 3-tier platform and will introduce a new Windows 8 interface. And, just as NAV 2013’s interface conformed to Office 2010 standards; Sicily will be closely tied to Office 2013.

"Sicily" will introduce a new Windows 8 interface.

I heard, Functionality changes will be less but a lot of technical changes including integration with office 2013 and office 365.

Hope Upgrade to newer version will be simple.

I think newer version will be ready in early 2014 and expecting a Beta release somewhere end of 2013.

What is Sicily -

Sicily  is the largest island in the Mediterranean Sea; along with surrounding minor islands, it constitutes an autonomous region of Italy, the Regione Siciliana.

waiting to see the Sicily..

Regards,
Saurav Dhyani
http://saurav-nav.blogspot.com/


Quick Entry - An Efficient Way of Data Entry in Microsoft Dynamics NAV 2013.

$
0
0
Hi all,

I was just browsing NAV 2013 during which i figured out a efficient way of entering data in NAV 2013 - QUICK ENTRY.

Let's see how to use it.

1. Open any Page, says Sales invoice Page.

2. Navigate to Customize this page as shown below.


Click on Fast Tab and select the Lines Fast Tab. Select Customize Fast Tab as shown below.


Click on Choose Column and from the right hand side panel, click on each field. You will find that every field have Quick Entry Checked as shown below.


Now lets change this as per our requirement.

My Requirement is, once i select Type and No. the cursor should point to fields as per the list below -

Location code, Quantity, Line Discount %.

So i will unchecked the quick entry on -

Description, UOM code, Unit Price, Line Amount.


Hit OK twice and page will get re-opened.

Now try creating lines, remember for applying navigation as per our requirement we need to Click Enter instead of Tab after filling value in field.

Once i enter type and no. - After clicking Enter my cursor points to Location instead of description.


I think this feature will provide an easy way to Enter Data.

REMEMBER - HIT ENTER INSTEAD OF TAB FOR NAVIGATION.

Regards,
Saurav Dhyani
http://saurav-nav.blogspot.com/

Multiple Copies Classic & RTC with Report Page No. Reset with Each Copy - Part 1

$
0
0
Hi all,

I found lot of Queries about this, so lets try to do this. I Divide this article into three parts -

1) Enabling Multiple Copies in a standard Report - Classic.
2) Enabling Multiple Copies in a standard Report - RTC.
2) Set Page X / Y in Multiple Copies printing Reports.

For the Demo i will be using Standard Report 16593 - Excise Invoice. This report have none
of the above listed points.

In this post we will try to use multiple copies options in this report, taking reference  Report 206 - Sales - Invoice.

1. Create a new DataItem With Name - CopyLoop after Sales Invoice Header.

2. Indent Other Data Items Below It to one more level as shown below.

BEFORE

AFTER

3. Set Properties for Copy Loop Data Item as - New Payer per record to YES.


4. Change the Property of Integer Header as shown below.


5. Cut Code from Sales Invoice Header - Trigger OnAfterGetRecords.


6. Paste the code IntgerHeader - OnAfterGetRecords.


7. Also cut the line of InitVariables from Sales Invoice Header onAfterGetRecords and Paste it in IntegerHeader - OnAfterGetRecords.

8. Taking Reference from Report 206 - Copy and Paste Code in Copy Loop - onPreDataItem and Copy Loop - OnAfterGetRecords as shown below.


9.Create Variables as per compilation Errors as shown below.


10.Add option of No. of Copies in Request Form.


11. Add the Copy Text & OutputNo From Report 206 in Section as shown below.


12. Now lets Run the Report in classic. yeah it works as expected. But it doesn't work in RTC that way.

Let's see changes that need to be done in RTC in Next post.

Regards,
Saurav Dhyani
http://saurav-nav.blogspot.com/

Multiple Copies Classic & RTC with Report Page No. Reset with Each Copy - Part 2

$
0
0
Hi all,

Let's Continue with the part that we left in last session (Reference Article 1)-

So we were done with classic report, let try to do same on RTC Too.

Again from taking reference from Report 206 we follow below listed steps -

1) Open Layout for Report 16593 - Excise Invoice.
2) Select the Table 1 in Body.
3) CUT IT.
4) From the tool bar select List and drop a list in Body.
5) Extend the size of List equivalent to the Body of the Report.
6) Paste the Table Cut in Step 3 back in body after selecting the list.
7) To Make sure that all above steps are done correctly, select table 1 and in properties window check the value at Parent Property. It Should be List 1 instead of Body as shown below.


8) Now Select the list and in properties click on Grouping.

9) Enter fields in Grouping  as shown below-
=Fields!Sales_Invoice_Header_No_.Value
=Fields!OutputNo.Value


10) Create the Request Page as shown below.


Now if we try to print the report in RTC it behaves as expected but the page no are not synchronized.

If you have any issues you can find the report with modification discussed in Post 1 & 2, on sky drive by clicking link - Object.
(FILE NAME - Report - 16593 - V2009 R2 {Multip Copy Classic & RTC))

These objects can be imported directly in NAV 2009 R2 IN.

In Next post we will see how to set the page no based on group and we will change the page no. format in RTC to Page X / Y reference article and we will see how to reset the page number based on No. of Copies.

Regards,
Saurav Dhyani
http://saurav-nav.blogspot.com/

Microsoft Dynamics NAV 2013 on Windows AZURE

$
0
0
Hi all,

During most of the demo session we had seen NAV 2013 on Windows Azure.


Finally Microsoft have released Feature Pack 1 for NAV 2013, which contain tools we will need to implement on Windows Azure.

NAV 2013 Feature Pack 1 can be downloaded from "Microsoft Dynamics NAV 2013 on Windows Azure Infrastructure Services"

Currently Feature Pack 1 is available for AU-Australia, AT-Austria, BE-Belgium, CA-Canada, DK-Denmark, FI-Finland, FR-France, DE-Germany, IS - Iceland, IN-India, IT-Italy, MX-Mexico, NL-Netherlands, NZ-New Zealand, NO-Norway, ES-Spain, SE-Sweden, CH-Switzerland, GB-Great Britain, US-United States and W1.

In Landing Page you will find Materials Under How to Series and videos for how to use Azure with NAV 2013.

Let's give it a try.

Regards,
Saurav Dhyani
http://saurav-nav.blogspot.com/

Started Tips & Tricks

$
0
0
Hi all,


Starting a new series - Tips & Tricks.


This Group of articles will contain Small Articles (may be one Line) which we need to take care during Use of Navision.

These will be Grouped Under Label Tips & Tricks.

Regards,
Saurav Dhyani
http://saurav-nav.blogspot.in/

Viewing all 1145 articles
Browse latest View live