Quantcast
Channel: Saurav Dhyani - #MSDynNAV & #MSDyn365bc
Viewing all 1145 articles
Browse latest View live

Tip #1 - Account used to Run Services For Navision RTC ?

$
0
0
Hi all,

TIP FOR CONSULTANT, not to be followed in Customer Environment.


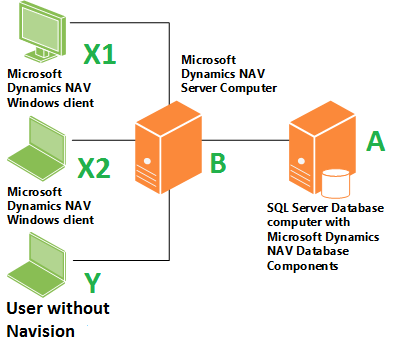
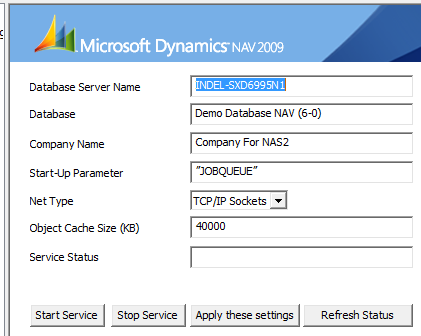
The account need to run Services of NAVISION RTC Client as per Microsoft Documents Should be a Domain Account with Password expiration policy set to False.


What if you are not in domain and the database and service are in your local machine?


If you are working at home and don't have a internet connectivity that can connect you to domain. Does this service Work?

NOT of Course.

The best way it to after configuration Just change the service to Run as Network Service.


For NAV 2009, 2009 SP1 & 2009 R2 you can change the logon parameter when you are not in domain

FOR NAV 2013 it does not apply.

Regards,
Saurav Dhyani
http://saurav-nav.blogspot.in/

Excel Integration With NAV 2013 - Part I

$
0
0
Hi all,

Today i will be explaining you the Send to Excel Feature in NAV 2013.

After installing NAV 2013, you might have found 2 Things

1. New Tab in Excel Called Microsoft Dynamics NAV as Shown Below.


2. Send To Option in List Pages as shown below.


If you don't find a New Tab in Excel, Please follow steps in this ARTICLE.

Now let's Export Sales Order List into Excel. (You can apply filters as per your requirement).

I am applying filter of Status Released.

After applying filter i clicked on send to excel and i got all record in Excel as shown below.


Points -
1) You will find Refresh Button Active Now in dynamics NAV Tab.
2) Line 1 have address of My Service.
3) Line 2 Have Details of Last Refresh (Update every time we click refresh).


Let's see its uses for Non NAV Users in a Organization in Next Post.

Regards,
Saurav Dhyani

Excel Integration With NAV 2013 - Part II

$
0
0
Hi all,

Integration with Excel Continued ... (Previous Article)

Now lets assume a Live Environment.

Server A have the Database, its a Database Tier (Navision).

Server B have the service, its a Service Tier (Navision).

Clients X1 & X2 have Navision clients.

Client Y is not a Navision User (Navision Client Not Installed).

We have synchronized Windows Login of X1, X2 & Y in Navision Database.


Story / Requirement -

Client Y Require to See below listed information in excel (Every Day)-
1) Release Sales Orders.

* But as per management we cannot provide access to Navision to Y.

Solution -

We have below listed options -

1. Either Client X1 or X2 Provide List to Client Y Daily by exporting it to excel.

2. We can have a report which can be automated using NAS to send daily to Client Y.

3. We can use the Excel Integration.

Solution Analysis -

Solution 1.
What if Both X1 & X2 are not in office ?
What if Y Requires the List At 8:00 AM but X1 & X2 reach office at 11:00 AM?


Solution 2. 
What is the filters have been changed, Partner intervention required to do customization.

Let's see how we can use Excel integration to full fill requirement of Client Y -

As discussed in Post 1, Either X1 or X2 can use Excel Integration with Navision 2013 and  Export Filtered Sales Order List to Excel.

As per Y Requirement, X1 / X2 Created the filtered view and exported it to Excel. The Excel Sheet will look like as shown below.


The First Row shows the service Path which points to Server B.

Q & A -

1) Does User Y have rights to use the service tier (server B) ?

YES.

2) Does User Y have Refresh Tab in Excel to get the updated information from NAV?

NO.

In the next post we will see how we can bring that Dynamics NAV tab in User Y Machine.

Regards,
Saurav Dhyani

Excel Integration With NAV 2013 - Part III

$
0
0
Hi all,

Integration with Excel Continued ... (Previous Article 1& Article 2)

NAV USERS WHO CANNOT SEE DYNAMICS NAV TAB IN EXCEL CAN START FOLLOWING STEPS FROM STEP NO. 5.

So lets configure User Y Machine so that he can use the Excel Provided by User X1 / X2 to get updated data.

1) For Getting Microsoft Dynamics NAV Tab in Excel we need to install a Visual Studio Tool For Office(VSTO) named as - Microsoft.Dynamics.Nav.ExcelAddin.

2) The setup on a NON Navision User have some Pre-requisites -

a) Microsoft .NET Framework 4.5.
b) Microsoft Visual Studio 2010 Tools For Office Redist.

These Pre-requisites can be found in Prerequisite Components of Navision DVD as shown below.


3) So we will install these components on Client Y Machine.

4) No for installing VSTO Excel Addin there are two way -

A) Copy RoleTailored Client Folder From "c:\Program Files (x86)\Microsoft Dynamics NAV\70" from user X1 / X2 machine to User Y Machine.

B) Copy below listed files from User X1 / X2 machine. These files can be found under
"c:\Program Files (x86)\Microsoft Dynamics NAV\70\RoleTailored Client" to User Y Machine.

Microsoft.Dynamics.Framework.Patterns.dll
Microsoft.Dynamics.Framework.UI.dll
Microsoft.Dynamics.Framework.UI.Extensibility.dll
Microsoft.Dynamics.Framework.UI.Extensibility.xml
Microsoft.Dynamics.Framework.UI.Mapping.dll
Microsoft.Dynamics.Framework.UI.Navigation.dll
Microsoft.Dynamics.Framework.UI.UX2006.dll
Microsoft.Dynamics.Framework.UI.UX2006.WinForms.dll
Microsoft.Dynamics.Framework.UI.Windows.dll
Microsoft.Dynamics.Framework.UI.WinForms.Controls.dll
Microsoft.Dynamics.Framework.UI.WinForms.DataVisualization.dll
Microsoft.Dynamics.Framework.UI.WinForms.dll
Microsoft.Dynamics.Nav.Client.ServiceConnection.dll
Microsoft.Dynamics.Nav.Client.UI.dll
Microsoft.Dynamics.Nav.Client.WinForms.dll
Microsoft.Dynamics.Nav.ExcelAddin.dll
Microsoft.Dynamics.Nav.ExcelAddin.dll.manifest
Microsoft.Dynamics.Nav.ExcelAddin
Microsoft.Dynamics.Nav.Language.dll
Microsoft.Dynamics.Nav.Types.dll
Microsoft.Office.Tools.Common.v4.0.Utilities.dll
Microsoft.Office.Tools.Excel.v4.0.Utilities.dll
Microsoft.Windows.Shell.dll
RibbonControlsLibrary.dll

5) Run Microsoft.Dynamics.Nav.ExcelAddin from the folder,icon shown below.


6) You can check installation status also in control panel.


Now user Y will find Dynamics NAV Tab in Excel and he/she can refresh the list whenever required, to get updated data.

I hope these integration post might help you.

Regards,
Saurav Dhyani
http://saurav-nav.blogspot.in/

What is Use of Attach file in Open Database Window ?

$
0
0
Hi all,

I was wondering from a long time for the use of Attach File in Open Database Window. I don't know you have noticed it ever or not.

Curiously i pressed F1 to find out use of it and here is what i got -

"If you want to attach and open a detached database that consists of a single data file, excluding the transaction log file, then you must enter the complete path and file name of the database in the Attach File field. This file typically has the .mdf file name extension. You can give this single file database any name by entering it in the Database Name field on the General tab. If no transaction log file exists with the data file, it is automatically created when you attach the data file. The database file is attached when you open it."

It means if i have -

1) Rights on SQL Server to create a database.
2) A detached database with single mdf file.

I can attach that database without opening SQL Server Management studio.

Great! lets try this -

Below is the image of my SQL Server Database before i start.


I have a mdf file placed in my D Drive that i want to attach.


I opened navision client and clicked on open database, below are the properties that i set -


Where i selected the server, Provided a database name, Authentication, and Attach File Path with Name.

Once i clicked ok, this is what happened.


Let me see my SQL Server management studio.


I have the new database attached here. Great.

I don't why i haven't seen it earlier.

I am not sure from which version it started but i just checked its there from version 4 onward.

Hope you like it.

Regards,
Saurav Dhyani
http://saurav-nav.blogspot.in/

Latest Updates from Partner Source

$
0
0
Hi all,

While browsing Partner source i found some nice KB articles which i think of sharing.

Just follow the link below to download the Hot fix or Read the KB Article.

One of the major finding is the Reverse Charge for Microsoft Dynamics NAV 2013 - IN.


1. Service Tax – Reverse Charge for Microsoft Dynamics NAV 2013 - India

2. How to Download a Microsoft Dynamics NAV License from CustomerSource

3. How to: Install the Connector for Microsoft Dynamics

4. How to Determine the Number of Licensed Sessions in Microsoft Dynamics NAV

5. Costing Error Detection and Data Correction White Paper for Microsoft Dynamics NAV


* For all the links above you will require a valid partner source credentials.

Hope you find the post useful.

Regards,
Saurav Dhyani
http://saurav-nav.blogspot.in/

Features Not Available in Service Tax – Reverse Charge for Microsoft Dynamics NAV 2013 - India

$
0
0
Hi all,

While browsing the document for Service Tax - Reverse Charge Hotfix Released for Microsoft Dynamics NAV 2013 IN, i found out that there are Some features which are not support by this Hotfix.

Below is the List of FEATURES NOT IMPLEMENTED IN THIS RELEASE -

The following scenarios or features are out of scope for this release. They are either not supported due to business requirements set by law or have not been addressed within the current scope of this regulatory update.

1. Invoice / Advance Payments in Foreign Currency with Service Tax that are payable on reverse charge or split basis.

2. Statistics form does not display the Computed Service Tax Value payable to a Service Provider.

3. Single invoice that has multiple lines and different Service Tax Group Code, Tax Type or Service Tax Registration No’s.

4. Invoice that contains two lines, where the first line is an Item with Service Tax and the second line does not have service tax, but does have Excise / VAT. As a workaround, you can issue separate invoices.

5. Advance Payment with Service Tax and TDS, applied to an Invoice with Service tax and TDS / Work Tax during offline application.

6. Application of multiple documents containing service tax within a single posting.

7. Unapplication if either the payment or the invoice contains TDS and Work Tax.

8. Unapplication if Input Credit has been utilized in a Reverse Charge / Split scenario.

9. Advance Payment with Service Tax Type of Split with TDS and Work Tax Calculations

10. Service Type (Rev Chrg.) option of Inward or Outward only works for Reverse Charge 100% and Reverse Charge portion in a split scenario.

11. Service Tax Adjustments have not been enhanced.

12. Per current law, abatement only exists with 100% Reverse Charge or 100% PoT Service Type. Accordingly, Split types of Services are not supported for Abatements.

13. Opening entries for Vendor with Service Tax.

14. Invoice with Service tax and discounts have not been enhanced.

15. Taking avail credit from only one of the Service tax components. If you decide to avail credit of Service Tax, you have to take credit of E-Cess / SHE Cess in the same activity.

NOTE -


Existing service tax reports have been enhanced in this release. However, the recently released ST-3 Return modification specified through Service Tax Notification No 01/2013 dated February 22, 2013 is not a part of this feature.

Regards,
Saurav Dhyani
saurav-nav.blogspot.in

Installation of JET Reports.

$
0
0
Hi all,

Let's see how to install JET Report Addin for Dynamics NAV till NAV 2009 R2.

For Installing JET Report Please download Jet Report from Link.
* To get access to the link you need to have an account with JET Report.

Jet Report Installers are available in 32 & 64 Bit, based on your excel version.

Excel Version can be checked From File -> Help, as shown below -


Download the JET Report Essential as per your Excel Version (32 / 64 Bit).

Close all excel files before you begin installation.

Below are the steps of installation of Jet Essentials Setup 12.5.13039.0.
* Pre-requisites that are required are installed by the installer.

1. Right Click the installer and select Run as Administrator.

2. Select Language.


3. Click Next on the Welcome Wizard.
4. Provide User Name And company Name and click Next.
5. Select Complete from type of Setup and click Next.
6. Click Install.
7. After completing Installation select check box for activate Jet Report for Current user and Un-check Launch the Jet Resource Page.


8. Installer will start activating the Jet Addin.


9. You will get a popup saying "The Jet add-in has been activated for user '<USER NAME>'."

10. Click OK and Open Excel.

11. If you don't find the JET Tab in the Excel Toolbar then manual activation is required.


12. FOR MANUAL ACTIVATION -

a) Navigate to File -> Options in Excel.


b) In Excel Option from Left Panel Select Add-Ins and click GO as shown below.


c) Click Browse and navigate to folder where JET Report is installed. (Default Path - C:\Program Files (x86)\JetReports)

d) Naviagte to the end of the list and select JET Report Addin as per excel version.
* Version 2010 support - .xlam
* Previous Version support - .xlm
You will get error if you select the incorrect version.


e) Click OK, you will find a new tab called JET in Excel Toolbar.


In Next Post we will see how to configure JET Report so that we can start creating Jet Reports.

Regards,
Sauav Dhyani
saurav-nav.blogspot.in


Configuration of JET Reports.

$
0
0
Hi all,

For Installation of JET Report Please refer post.

Let's see how to configure JET Report for using Report Development or Viewer.

Before Beginning the configuration please keep these files ready -

a) Navision Licence File (.flf).
b) JET Report Licence File (.jlf). *corresponds to Navision Licence File.
c) Navision Classic client should be installed (JET Report Require ActiveX control to Work).

Steps -

1. Copy the JET Report License File (JLF) File to "C:\Program Files (x86)\JetReports".
*Not Mandatory just Best Practice.

2. Copy the Navision Licence File (FLF) File to location of your classic client "C:\Program Files (x86)\Microsoft Dynamics NAV\60\Classic" with name as fin.flf.

3. In case database in on SQL Server then upload the licence on the Server using NAV Client.

4. JET License contain License No. of Navision Licence, so make sure that you use JET Report Licence which corresponds to NAV Licence, as shown below.


5. So we have all license in place as shown below.


6. Let's start Excel and do the configuration.

7.As of Now Excel Application Setting, Data Source Settings, Help and About are enabled.

8.Open Application Settings - Licensing.

9.Browse the path of Jet Licence - "C:\Program Files (x86)\JetReports".

10.Click on Data Source Settings.

11.Click on Add and Fill in details as shown below.


12.Under General Tab, Provide Detail of Classic Client Folder.

13.Under Authentication Select Type of Authentication.

14.Under Connection Provide Server,Database Name and Company Name.


15. IF all the steps followed as discussed you will see the icon as green as shown below.


16. IF its red you can click on the Red Icon and see the error that is raised.

If you have any errors please put as comment the error message, we will suggest you the solution for same.

In future post related to Jet Reports we will discuss about conman issues in Jet Reports configuration.

Regards,
Saurav Dhyani
http://saurav-nav.blogspot.in/

JET Report Configuration Issues..

$
0
0
Hi all,

Let's see common issues faced with JET Report and there resolutions.

The Best way to find issue is -

1) Open Excel.
2) Click on Data Source Settings and see Color of Icon in Left Bottom.
3) If its Red there are some configuration error, click on Hyperlink Next to Red Icon.

ERROR 1 - 
"A Jet license file with license number '5192936' was not found. The Jet license number must match the license number in the Dynamics NAV license file."


Cause -
1) Either the path of license is not specified in Licensing Tab of application settings.
1) OR the Jet License is not placed in the path specified of Licensing tab of Application Settings.
2) OR the License is not corresponds to the NAV License.

Resolution -
Check the License in Jet Folder and Classic Client Folder as well as on Server.


ERROR 2 - 
"Jet could not verify your license status for the following reason: You must specify a Database Name.Please check your data source settings."


Cause -
Server Name,Database Name and Company Name is not specified, in Connection Tab of Data Source Settings.

Resolution -
Specify Server Name,Database Name and Company Name is not specified, in Connection Tab of Data Source Settings.

ISSUE 3 - 
The JET Ribbon shows as below.


Cause -
You are licensed as Viewer.

Resolution -
Send your License to JET Report for updating of designer names in license.

If you have any other issues please send it to me.

Regards,
Saurav Dhyani

Code Coverage for Dynamics NAV 2013

$
0
0
Hi all,

Just an update.

While using NAV 2013 i was missing a great tool that was Code Coverage which used to resolve most of issues during debugging.

It was used to show objects that have been called during execution of a Function.

Microsoft have released "Application Test Toolset for Microsoft Dynamics NAV 2013", which also contain Code Coverage tool for NAV 2013.

There are many other tools which can be used.

Lets try them out with below link.

If you want to download just the Code coverage tool, then follow the MIBUSO Link.

If you want the complete Application Test Toolset for Microsoft Dynamics NAV 2013 then follow Link (Partner Source Login Required).

Of course we know how to use Code coverage, but if you want to learn how to use other tools shipped in Application Test ToolSet for Microsoft Dynamics NAV 2013 then follow the Link.

Hope these tools make our programming life easier.

I will try to use other tools shipped and will come up with some post if required.

Regards,
Saurav Dhyani
saurav-nav.blogspot.in

NAS Installation Before NAV 2013

$
0
0
Hi all,

Let's see how to install NAS (Navision Application Server) in this post.

Remember -

1) Never Run NAS from NAS folder inside DVD, as it dosen't install its pre-requisites using this installation procedure.

2) Always use Auto run and Select Application Server to install.

For demo i will be Using NAV 2009 R2 IN.

Let's Begin...

1) Start the Autorun as Run as Administration.

2) From the Window Under Install Select Microsoft Dynamics NAV.

3) If you have already installed then select Add or Remove Components.


4) Click on Link at Application Sever to Provide Friendly Name for NAS Services.
* Installer automatically install NAS for Classic and SQL.


5) Apply Parameters and click Next.


6) After installation Click OK.

Remember -

* NAS SERVICE ALWAYS RUN WITH A DEDICATED DOMAIN ACCOUNT.
* Suggested - Create a domain account with password expiration policy set never expires. we will use same for Running NAS Services.

7) Navigate to Services (By Clicking on RUN and services.msc).

8) As seen below we can see the two services for Native and SQL Client.


9) As shown these services are currently running with network services, please change the login to Default Domain account.

10) I will be using with SQL Database so i will use the service for SQL.


11) Don't try to run the service, as its not configured yet.

we will discuss the configuration in next post.

Regards,
Saurav Dhyani
saurav-nav.blogspot.in

NAS Configuration Before NAV 2013

$
0
0
Hi all,

As discussed in earlier post about NAS Installation. Let's proceed with NAS Configuration.

From Start Menu or Administrative Tools under Control Panel Open - Application Server Manager for Microsoft Dynamics NAV.

1) Right Click the Application Server Manager for Microsoft Dynamics NAV and select New - Application Server.


2) Provide the
   a) Host name - Server Name where Service is installed.
   b) Service Name - Name of Service (can be get from services.msc).


3) Click OK.

4) Click on the New Node Created and enter details of Server, Database & Company Names.


5) For Next Parameter i.e Start-up Parameter you need to check the valid values for this in Codeunit 1 Function NASHandler.

For Demo we will be using commonly used parameter - JOBQUEUE.
*When we select job queue it, checks the job queue setup and Job Queue Status.Finally it run the codeunit unit JOB QUEUE DISPATCHER.


6) Click Apply these settings and click Start Service. This will initialize the NAS Service for this company.

You can check the active session on this database and you will find a new entry for application Name "Application Server for Microsoft Dynamics NAV Classic".


NAS is configured Properly.

* When you try to close the NAS SNAPIN, it will ask you to save, Please select No. The session is already created.

we will see uses of NAS and installation of other instance of NAS in future post.

Regards,
Saurav Dhyani
http://saurav-nav.blogspot.in/

Numbering in NAVISION...

$
0
0
Hi all,

I always used to get confused during development about numbering of objects & fields.

Today i browsed and found out a link which explain mostly all the commonly used numbering patterns in Navision.

Let me summarize them -

1) Objects Numbers have following bifurcations -  


2) The fields in Microsoft Dynamics NAV are grouped as indicated in the following table.


3) Standard Reports are grouped based on Application areas as below -


4) Codeunits are also grouped based on there Final Digits.


Also as per Microsoft Article - 
"Do not use the object numbers 99,000 - 99,999 for objects that you create, even though they are in the customer design area. The training material for Microsoft Dynamics NAV uses these numbers."

The detailed article can be found at MSDN.

Hope this helps someone who have same doubts like me.

Regards,
Saurav Dhyani
saurav-nav.blogspot.in

Delete a language layer from database objects.

$
0
0
Hi all,

During upgrade one of the conman issue is extra language in database objects.

Consider a Scenario -

My client During implementation uses NAV 5.0 SP1 APAC Database.
But as the language English (New Zealand) was not required had been deleted before implementation.

Now client want to upgrade to NAV 2013 APAC. For comparison i require to create a base database which will be in my case NAV 5.0 SP1 APAC without Language
English (New Zealand).

Let's see how we can delete the Language Layer from a database. I will take example of above scenario.

1) Open NAV 5.0 SP1 APAC Database.

2) You can check existing Language From
   - Open properties of any field in any table and check caption ML.


3) As per our requirement we don't require ENZ (English (New Zealand).

4) Open Object Designer, Select All Objects.

5) From Tools Click Language Module and select Export.


6) Provide the File Name, Select Language you want to delete and click Delete Language.


7) Click OK and it will remove the Language Layer from Objects.


8 Click on confirmation box for language deletion.

9) Reopen Navision and just to make sure repeat step 2.


So we have successfully deleted the language layer from the database objects.

In Next post we will see how to add the same language into another database objects.

Regards,
saurav Dhyani

Add a language layer from database objects.

$
0
0
Hi All,

Let's discuss a conman Question mostly asked/raised during Upgrade Process.

How do i add a language Layer to my Database.

What is Use Language Layer?

Language Layer Enable to Database Objects to Support Multiple Language.

How to find languages in my database?

1. Open any objects in your database (say table).
2. Select any standard field and navigate to its properties.
3. Check the Value in CaptionML Property.
4. This will list the caption of field in all the languages that you have in your database.


5. As shown above the field have single language (ENU).

If we want to add a language in a database we need to remember three point -

1) The applied language layer only update captionML property of Standard Fields ONLY.
2) You cannot import Language layer until and unless all the objects of database are compiled.
3) You require the .flm file of the language you want to add.
4) Once language is imported all the objects have modified flag set to True.


Steps to Import Language Layer -

1) Open Classic Client / Developer Environment.
2) Open Object Designer.
3) Select All Objects.
4) From Tools Select Language Module and select Import.


5) Select the Flm File and click Open.


Open the same table and open the same field you will find multiple values in captionML Property of field.


I hope you will find this post useful.

Regards,
Saurav Dhyani
http://saurav-nav.blogspot.in/

Installation Steps of Microsoft Dynamics Navision Developer Toolkit.

$
0
0
Hi all,

Let's see how to install Developer toolkit for Microsoft Dynamics Navision.

This has been discontinued by Microsoft but most of us still requires it during upgrade process.

This is the first step of Upgrade Process.

Download the developer toolkit as per your requirements. You can easily find them in partner source or in Mibuso.

1. Run setup.exe.
2. Click next until you reach the screen shown below.


3. At this point you need to specify the path of Licensce that will be used by developer toolkit and STX file.

4. You will have the licensce file with you but for STX file browse the same folder where the setup is been kept. The setup contain the STX File.


5. Provide path of both the files and click next.


6. Click Finish.

Developer toolkit have been installed.

we will see how to create a developer toolkit database in another post.

Regards,
Saurav Dhyani
saurav-nav.blogspot.in

Save Navision RTC Reports into PDF, Word & Excel..

$
0
0
Hi all,

If you would have noticed with the introdcution of RTC Client in 2009 i.e NAV 2009, in C/AL Symbol Menu Report have some new options.

1. Save as PDF.
2. Save as Excel.


And after release of NAV 2013 There is one more addition to the list.

3. Save as Word.


Let's discuss what is required to use these options as then try to use them.

Requirement -

1) The Report that you are planning to save as PDF/Excel/Word should have RTC Layout Created. (Before NAV 2013)

So let's try this with a standard report Report 206 "Sales - Invoice" with NAV 2013.

I am adding options to Save AS in the Action of The Posted Sales Invoice Page as shown below.


Now i will add code in the all the actions as shown below.


So lets try to use these buttons from RTC.

I opened the Posted Sales invoice page in RTC, and as shown below i see three icons for save as PDF. save as word & save as excel.


As soon as i clicked on all these icons below is the output on my D Drive.


Here is how the output looks.


* Remember these functions will overwrite the file with same name in same location if any.

Future Customization (What i can think, you might add to this) -

a) Path can be setup based.
b) File name can be document Number.
c) Report No. can also be setup based.
d) This can be in one single button to save in all three formats.
e) You can automate it Via NAS.

I hope you will use these post for customization like sending reports to client in PDF/Word/Excel Format.

If Required download modified Page for NAV 2013 IN Version from my skydrive.

Regards,
Saurav Dhyani
saurav-nav.blogspot.in

Multiple NAS Before NAV 2013.

$
0
0
Hi all,

In Previous posts we discussed how to install NAS and configure NAS on your system.

Please move ahead with steps only if you have one NAS installed as discussed in previous post.

*Remember NAS is Company Specific (It means once instance of NAS cannot run for multiple companies).

What is my client want to have use NAS in two companies or two databases.

Let's see how we can do that.

Default Installation Path for NAS is - C:\Program Files (x86)\Microsoft Dynamics NAV\60.

1. Navigate to the folder and copy and paste it to same location as shown below.


2. Name the copied folder as per your requirement. I name it as "Application Server2".

3. Now we need a service that will be used to activate and configure it.

4. Open Command Prompt (RUN AS ADMINISTRATOR).

5. Navigate to new folder path with following command -

cd C:\Program Files (x86)\Microsoft Dynamics NAV\60\<FolderName>

in my case

cd C:\Program Files (x86)\Microsoft Dynamics NAV\60\Application Server2

6. Click Enter Your Command Prompt Should look like this.


7. Copy and Paste Below Command on Notepad.

nassql.exe appservername=NAS2, NETTYPE=TCP, servername="INDEL-SXD6995N1",database="Demo Database NAV (6-0)", company="Company For NAS2", nettype=tcp,startupparameter=”JOBQUEUE”, objectcache=40000, installasservice

8. Change below listed parameter as per you requirement.

 a) AppServerName - Name of NAS Instance you want to give.
 b) Server Name - Name or IP of your Server.
 c) Database - Database Name on the server.
 d) Company - Company Name for which you want to configure.

9. Copy the command into command prompt and click enter.

10. NAS2 is installed and you will get a confirmation on Command Prompt as shown below.


11. Now let's navigate to services.msc to check the new service created.

12. We have a new service named NAS2 As shown below.


13. Now change the login to windows Login and open configuration panel of NAS.

14. Click and Select New Application server.

15. Enter Details of server and Service Name (as per new service created).


16. Other details are already filled in while creating service.


17. Just click start and service will be started.

Hope you will be able to configure multiple NAS Session in your system.

* In case you are planning to configure NAS for Native Client then in step 7 Use Nas.exe instead of NasSQL.exe.

Regards,
Saurav Dhyani
http://saurav-nav.blogspot.in/

How to Create Navision Developer Toolkit Database?

$
0
0
Hi all,

In previous post we had seen how to install developer toolkit.

Now for performing any action in developer toolkit we require a developer toolkit database.

REMEMBER -

1. Developer Toolkit Database Support Specific Version of Database Created. Please use correct NAV Version for creating database.

 NDT 3.1 - NAV 2009.
 NDT 2.93 - NAV 4SP3.

* You can find details about database version in PDF that comes with Setup.

Let's see how to create a developer toolkit database.

1. Open Navision Client and create a new database.
(Native & SQL both databases are supported by Developer toolkit).

In my Case NDT Version is 3.01, so i will be creating database in NAV Version - 6.0 (for Toolkit Database).

2. Create a new company say "Toolkit".

3. Open Object Designer.

4. Import Developer Toolkit Objects from the directory where it is installed.

Default Path - "c:\Program Files (x86)\Microsoft Dynamics NAV\Developers Toolkit\"

5. File Name DevTool.fob.


6. Twenty Objects will get created.

7. Create windows / Database login with super rights in database.

8. Close the database and navision client.

9. Open developer toolkit and open the database created for toolkit.


10. Open Company "Toolkit". (Created in Navision)

We have successfully created toolkit database for Developer toolkit for Microsoft Dynamics NAV.

In Other post we will see how to import objects in Toolkit database.

Regards,
Saurav Dhyani
saurav-nav.blogspot.in
Viewing all 1145 articles
Browse latest View live